| 4/8/01
-
The Decision |
 A day which will resonate throughout
the days remaining in my pathetic life.
Today is the day in which I made the decision
to build a boat. I made the decision lightly,
almost cavalierly, and yet, once made, the decision
resulted in a rush of idiotic euphoria that had me
feeling good about myself for perhaps a full eight
minutes.
A day which will resonate throughout
the days remaining in my pathetic life.
Today is the day in which I made the decision
to build a boat. I made the decision lightly,
almost cavalierly, and yet, once made, the decision
resulted in a rush of idiotic euphoria that had me
feeling good about myself for perhaps a full eight
minutes.
This feeling died a horrible death as I
contemplated the future home of my nascent marine
construction career.
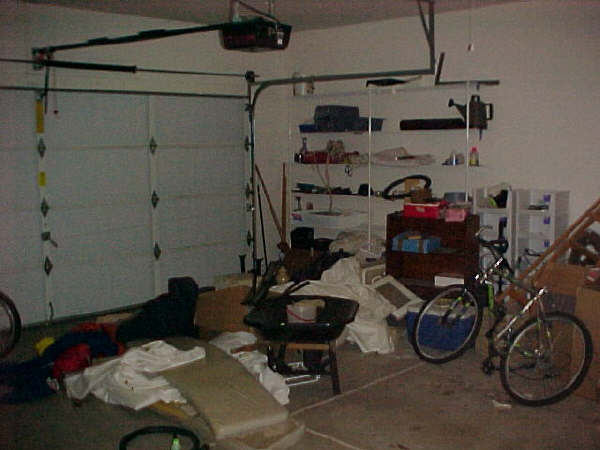
I am a slob of the first order. Nothing
is so important that it cannot wait to be done
until some unspecified date in the future. You
can see that this is so by taking a quick look
at the state of my garage.
I once had a neighbor
who was a classic type "A" personality. Polished
his garage floor, washed his car once a week, spent
days upon days working in his yard, the whole bit.
My garage drove him nuts. I took special delight
in this.
|
| 4/9/01
-
Choosing the boat |
 Today the decision moved from the realm of
fantasy to the realm of expensive fantasy.
I ordered two items; a set of plans for the
Acorn Tender from Wooden Boat
and a book by Iain Oughtred called "Clinker
Plywood Boatbuilding Manual."
Today the decision moved from the realm of
fantasy to the realm of expensive fantasy.
I ordered two items; a set of plans for the
Acorn Tender from Wooden Boat
and a book by Iain Oughtred called "Clinker
Plywood Boatbuilding Manual."
It is my fervent hope that good Iain can
guide this foolish amateur from his current
state of ineptitude with all things tool-like
to at a standard of proficiency sufficient to
keep all of my body parts attached.
Aside from my total abhorrence to pain, I'm
convinced that one cannot be accepted into heaven
unless all of the appendages one was issued at birth
can be accounted for.
|
| 4/10/01
-
Kevin Springs into Action |
 "But as this enterprise appeared to
me to be one of great magnitude, I waited until I
had attained an age so mature as to leave me no
hope that at any stage of life more advanced I should
be better able to execute my design. On this account,
I have delayed so long that I should henceforth consider
I was doing wrong were I still to consume in deliberation
any of the time that now remains for action."
"But as this enterprise appeared to
me to be one of great magnitude, I waited until I
had attained an age so mature as to leave me no
hope that at any stage of life more advanced I should
be better able to execute my design. On this account,
I have delayed so long that I should henceforth consider
I was doing wrong were I still to consume in deliberation
any of the time that now remains for action."
Rene Descartes, Meditations, 1641
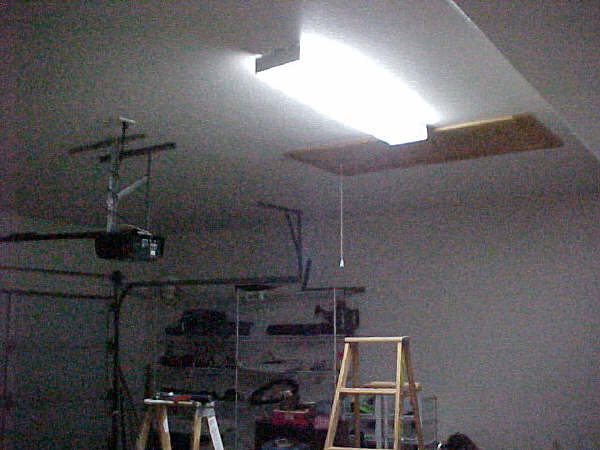
Right, Rene! So today I took action. Check out the
great fluorescent light I installed in my garage!
Rene would have been proud of me.
|
| 4/11/01
-
A Slow News Day |
 I'm struck by how little boat building is actually
going on here. Perhaps just talking and thinking about boat
building is quite enough for some people. I don't think
it is for me, but I haven't actually built anything yet,
have I?
I'm struck by how little boat building is actually
going on here. Perhaps just talking and thinking about boat
building is quite enough for some people. I don't think
it is for me, but I haven't actually built anything yet,
have I?
This is my dog, Tucker. He's wearing what is known as a
"Buster Collar," meant to keep him from chewing on
tender parts. And are his parts tender! He was neutered today,
and my heart goes out to him.
I know that the procedure is for the best, but if there's
anything that even comes close to describing the meaning
of life, it has to be the need for all creatures to have
sex, and to procreate, and the fact that Tucker has had
that taken from him saddens me. Fortunately he won't hold me
responsible for his disfigurement.
Good dog.
|
| 4/12/01
-
Work Bench Genesis |
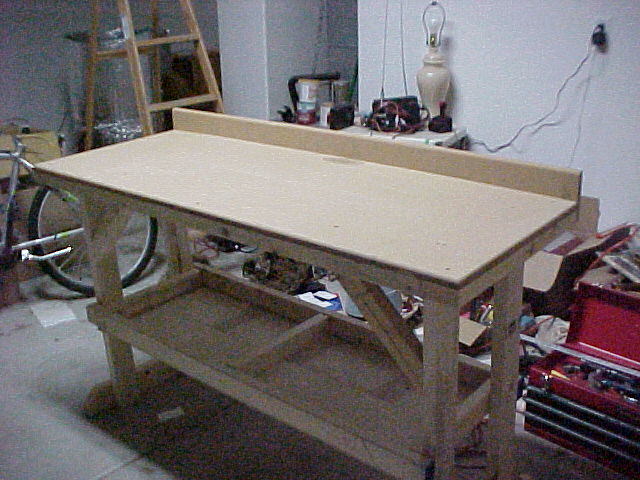 Every good boat-wright needs a work bench, so I built myself
a nice one. Note the skill with which this particular piece was
rendered.
Every good boat-wright needs a work bench, so I built myself
a nice one. Note the skill with which this particular piece was
rendered.
I don't really know what all the fuss is about with
this overblown fawning over "skilled craftsmen." Hooey. What's the
big deal, anyway? Just go down to the Home Depot, pick up one
of those workbench kits in a box, slap it together and there you
go. This wood working stuff is easy.
|
| 4/13/01
-
The Plans Arrive |
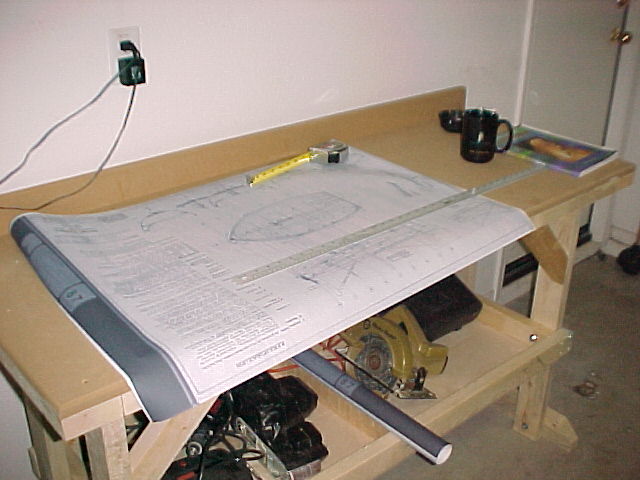 Okay, enough of the chit-chat. The plans and the book got here today,
and a quick look at the plans was enough to convince me that
I need to spend a great deal of time looking them over. There are
notes scrawled (very neatly) every which way and it's very likely
that if you don't examine every square inch of them, you'll miss
something pretty important.
Okay, enough of the chit-chat. The plans and the book got here today,
and a quick look at the plans was enough to convince me that
I need to spend a great deal of time looking them over. There are
notes scrawled (very neatly) every which way and it's very likely
that if you don't examine every square inch of them, you'll miss
something pretty important.
The plans also came with a smeary, poorly
executed xerox copy of some construction notes. On the first
few pages the copy is skewed to the left so that the first few
words of each sentence are somewhere off the page, and I have
to imagine what it is that they say. In most instances it's pretty
easy, and in the cases where they are not, the book fills in the gaps.
|
| 4/13/01
-
The Plans Arrive |
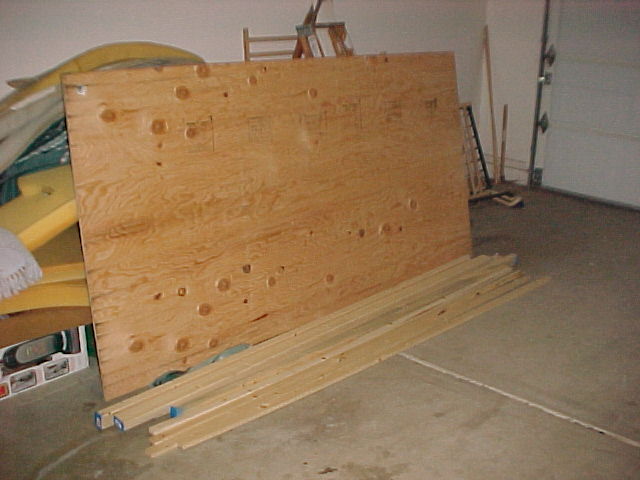 Okay, enough study, it's time to go buy some wood. The book talks at great length
about the difficulty in finding decent wood, but then cautions you
that when you do manage to find some good wood, it's probably
cut down in such a way as to kill some rain forest somewhere.
I plan to paint the hull
white to get that classic look, so the wood for the hull doesn't
have to be premium quality wood, but I do plan to have the stem,
keel and transom done in mahogany, so it will become an issue.
Okay, enough study, it's time to go buy some wood. The book talks at great length
about the difficulty in finding decent wood, but then cautions you
that when you do manage to find some good wood, it's probably
cut down in such a way as to kill some rain forest somewhere.
I plan to paint the hull
white to get that classic look, so the wood for the hull doesn't
have to be premium quality wood, but I do plan to have the stem,
keel and transom done in mahogany, so it will become an issue.
In any case, I have several days
before I get to the point where I have to worry about that. Right now,
the building frame and moulds have to be built, so I can get cheap
pine boards and plywood for that.
|
| 4/14/01
-
Building Frame |
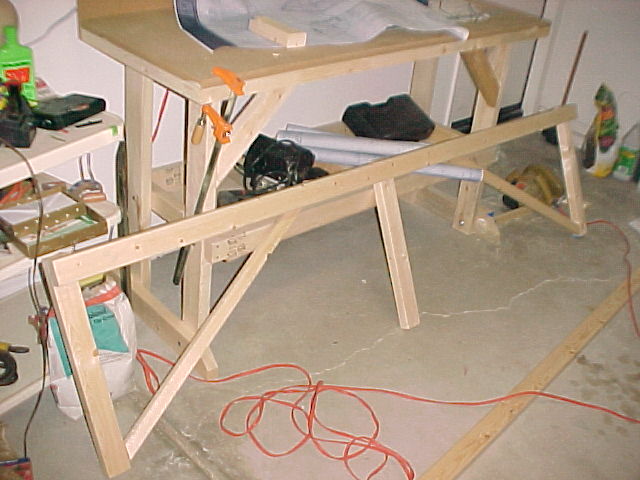 The moment in which it is determined whether or not I am
allowed by the fates to retain my full complement of fingers
has at last arrived. I begin the building frame. Many of the more
experienced among you will no doubt skip ahead to the more complex
bits, but the novices should take some time to study this part of the
project and get it right. That's made even tougher because most of my
reading skips over this relatively uninteresting bit, so I had lots of
questions about how to do this as I went along, and no real answers
anywhere. Unfortunately, as I went along the answers became clear in
the work that I ended up having to re-do.
The moment in which it is determined whether or not I am
allowed by the fates to retain my full complement of fingers
has at last arrived. I begin the building frame. Many of the more
experienced among you will no doubt skip ahead to the more complex
bits, but the novices should take some time to study this part of the
project and get it right. That's made even tougher because most of my
reading skips over this relatively uninteresting bit, so I had lots of
questions about how to do this as I went along, and no real answers
anywhere. Unfortunately, as I went along the answers became clear in
the work that I ended up having to re-do.
Still, it's
important that the thing be square and
level, because mistakes made here will be reflected in the final product.
I'm taking this on faith, because that's what my reading says.
In truth, I'm still struggling to manage a drill and a saw. Here I have
one half of the frame completed, and I can assure everyone that
the corners are by-God square.
|
| 4/15/01
-
The Complete Frame |
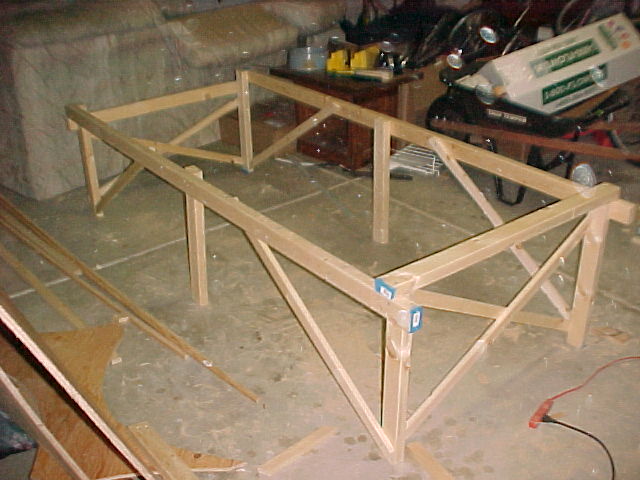 I don't really have much to add about this except to say that once
I got everything screwed together and after checking and re-checking
that the damned thing is really square, I took another hard look
at the plans and found that I got the after set of legs mounted too
far back, so I had to re-do that part of the project.
I don't really have much to add about this except to say that once
I got everything screwed together and after checking and re-checking
that the damned thing is really square, I took another hard look
at the plans and found that I got the after set of legs mounted too
far back, so I had to re-do that part of the project.
Now normally
I'd just call it a job done well-enough, but it turns out that the
frame needs the gap I eliminated to mount the transom mounting boards
(don't worry, we'll get there) so I had no choice but to do it right.
If this pesky need for getting things right is an absolute
requirement, I'm going to have endless amounts of trouble. Anyway, here's
the completed building frame. The astute will notice the couch
behind the frame. That's going to the Salvation Army on Wednesday. Apparently
they are in dire need of couches, so off it goes.
On to the moulds.
|
| 4/16/01
-
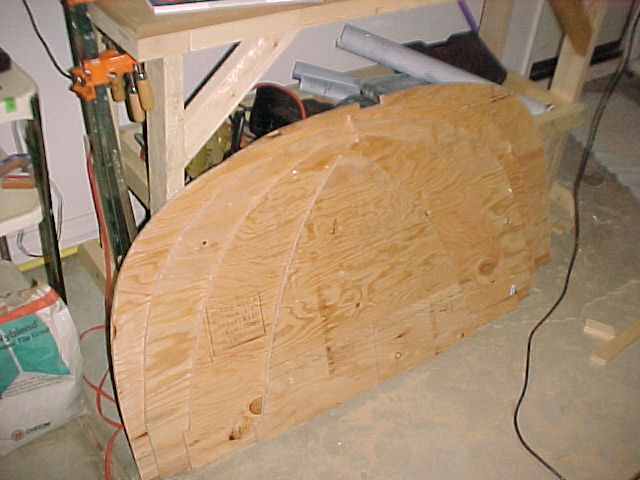
Marking Lines |
 As I read the chapter on laying up lines for plank lands, I came to the conclusion
that I'd
be lofting and laying up lines for the next two years. Iain Oughtred could not
possibly have made the process for doing this more confusing in his book, and
the photocopy instructions simply say there is no foolproof way to do it. This
was beginning to cause no small amount of panic until I realized (no thanks
to any documentation) that I didn't have to do this step because the plans
came will full size mould patterns.
As I read the chapter on laying up lines for plank lands, I came to the conclusion
that I'd
be lofting and laying up lines for the next two years. Iain Oughtred could not
possibly have made the process for doing this more confusing in his book, and
the photocopy instructions simply say there is no foolproof way to do it. This
was beginning to cause no small amount of panic until I realized (no thanks
to any documentation) that I didn't have to do this step because the plans
came will full size mould patterns.
I have to say that my confusion resulted not because Iain
is an incompetent writer (on the contrary, his book is well-written and
engaging.) Rather, it's because he assumes that I already know a great deal about
the process, so many details that seem intuitively obvious to him become matters
of earth-shattering import to me. At some point I will have achieved a level
of familiarity with all things boat, and then I too will exhibit impatience
with raw newbies. RTFM, buddy!
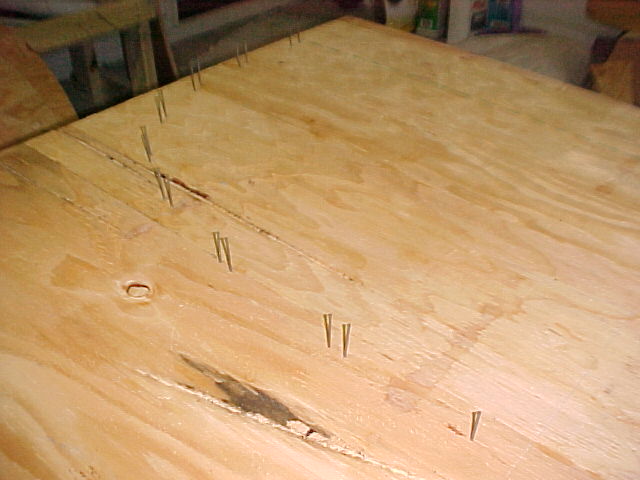
So here are nails pounded into the wood marking the outer perimeter of the
station 6 mould. When I'm done, I'll wrap a flexible metal strip across the
nails and mark the fair line it describes, then cut the board using the
resuling lines.
|
| 4/17/01
-
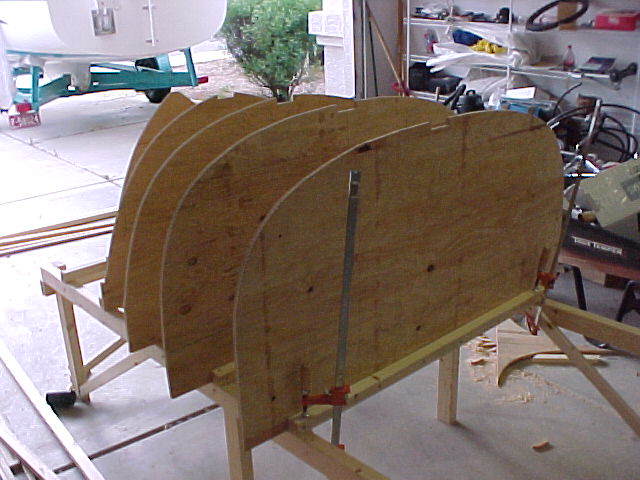
Moulds partway done |
 And here are several moulds already cut. I should point out that
I used a jig-saw for cutting the moulds, which was a first for me.
The last time I used any kind of saw to cut a line that was supposed
to curve around, I was in seventh grade woodshop and I used a coping
saw. At this point I have two more moulds to cut, then I will begin
adding the spalling and mount the moulds on the building frame.
And here are several moulds already cut. I should point out that
I used a jig-saw for cutting the moulds, which was a first for me.
The last time I used any kind of saw to cut a line that was supposed
to curve around, I was in seventh grade woodshop and I used a coping
saw. At this point I have two more moulds to cut, then I will begin
adding the spalling and mount the moulds on the building frame.
|
| 4/19/01
-
Mounting the Moulds |
 The moulds are all cut out and now it's time to begin mounting them. The
plans call for a 7/8" x 7/8" spalling to mount the moulds, but I
was unable to find anything like that, so I first tried 3/4" x 3/4"
stock. It seemed a little too wimpy, and as it turned out, I was
right. When I put in the screw, the rail split. Time for another
trip to Home Depot.
The moulds are all cut out and now it's time to begin mounting them. The
plans call for a 7/8" x 7/8" spalling to mount the moulds, but I
was unable to find anything like that, so I first tried 3/4" x 3/4"
stock. It seemed a little too wimpy, and as it turned out, I was
right. When I put in the screw, the rail split. Time for another
trip to Home Depot.
|
| 4/19/01
-
Mounting the Moulds |
 This is more like it. I used 2x2's which are really more line 1 1/2" and
these suckers are solid now.
This is more like it. I used 2x2's which are really more line 1 1/2" and
these suckers are solid now.
|
| 4/19/01
-
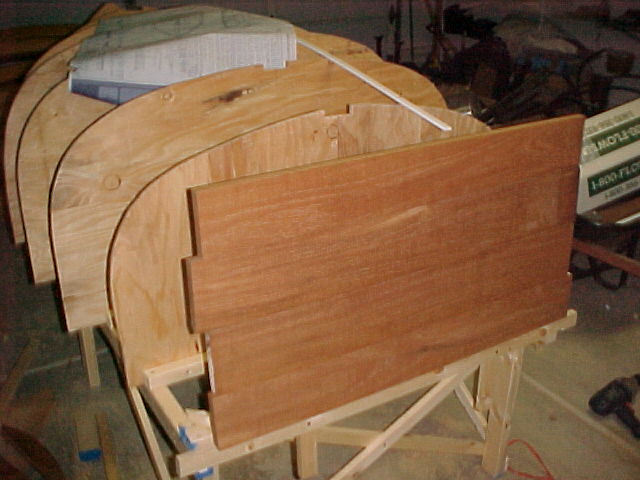
Mounting the Moulds |
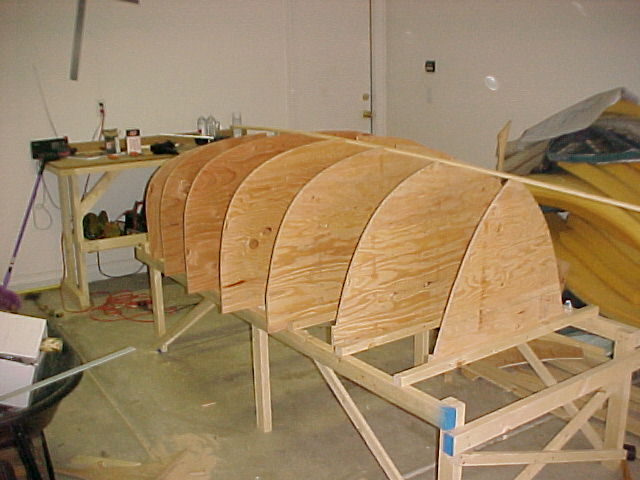 If you sort of half-squint your eyes, the shape of a boat sort of
springs to mind, doesn't it? That, or a row of tombstones
in a very crowded cemetary. So I've reached my second
milestone, the first of which was completing the building
frame, and now the possibility to pretend like I was building
a boat without spending a whole lot of money comes to
an end. Next steps are the stem, transom and hog, all of
which will be done with mahogany, if I can manage
to find anybody who sells it.
If you sort of half-squint your eyes, the shape of a boat sort of
springs to mind, doesn't it? That, or a row of tombstones
in a very crowded cemetary. So I've reached my second
milestone, the first of which was completing the building
frame, and now the possibility to pretend like I was building
a boat without spending a whole lot of money comes to
an end. Next steps are the stem, transom and hog, all of
which will be done with mahogany, if I can manage
to find anybody who sells it.
|
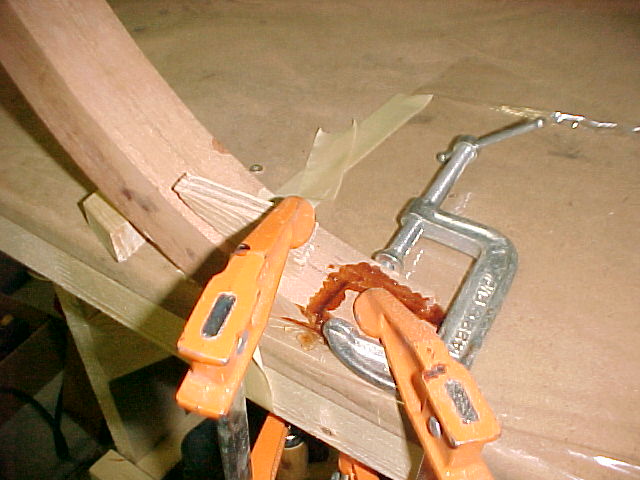
| 4/25/01
-
The Transom Brace |
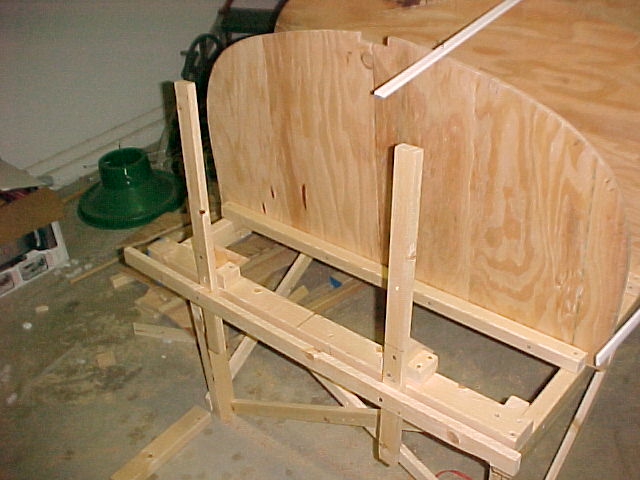
It's been several days since I have had a chance to work on the
boat. Part of the time has been spent scouring the city looking for
a source for wood meant for things other than slapping some frames
up and hammering fiber board to them, but I finally found a place
called The Woodworker's Source in Phoenix. The selection is amazing,
but you of course have to have a pretty critical eye to make sure
you get what you want.
In the mean time, I put together a contraption meant to hold the
transom at the 93 degree angle required by the plans, and amazingly
enough, these meet those measurements exactly. Once in a very great
while I do something right, but generally I have to do just about
everything at least twice before I get it the way I want it.
|
| 4/26/01
-
Fitting the Transom Boards |
I finally picked up what I considered to be pretty decent mahogany
and here I'm testing the fit of the boards to one another. The old
adage, "measure twice, cut once" is simply not sufficient for me because
I measure the cut of these boards several times and it still looks as if
I may have cut them too short, or at least they are so close as to leave
no room for error.
I also started putting the stem together, but I'm too ashamed to show
the pictures of the effort. You have two ways to go when putting together
the stem; you can laminate several thin strips of wood and epoxy to
build up the stem with the proper curve, or you can simply cut and glue
pieces together to build it up. I chose the latter method, during the
execution of which I botched up several pieces of beautiful mahogany
so bady that I wanted to cry. I haven't given up on it, but I'm definitely
considering other options.
|
| 5/9/01
-
Okay, the stem |
It's been a while since I posted, and a lot's been done, with puzzlingly
little progress to show for it. First I thought I'd give you a peek at my
first attempt at a stem pieced together from parts. This approach was really
hard to make work for an amateur-amateur because of the tricky mating
surfaces. Had I cut the entire stem from boards glued at a 90 degree angle
I think I could have made it work, but I chose instead to go with
what one would think is the more difficult approach, a laminated stem.
|
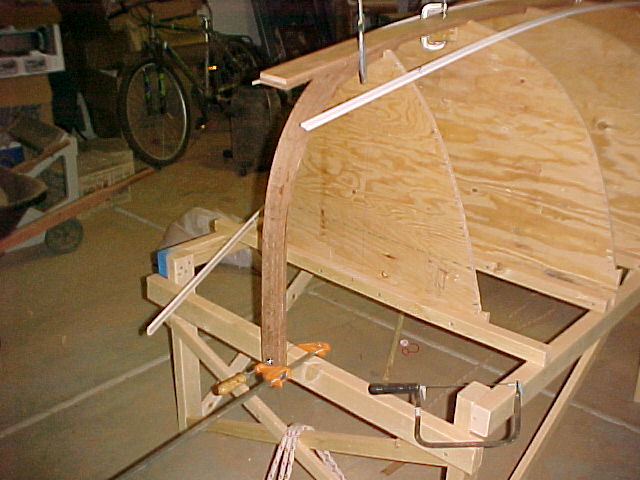
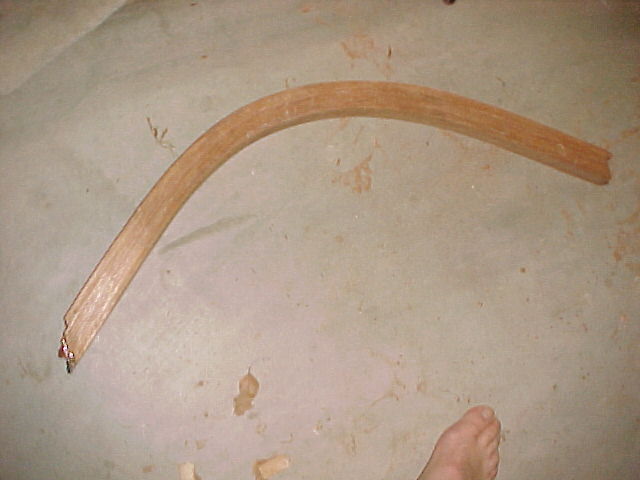
| 5/16/01
-
A Laminated Stem |

This picture shows the laminated stem I made, along with the outer stem
that I'm laying up using the inner stem as a form. To make the stem I glued
two 36 inch long 1x4 planks face to face. I then used a table saw to cut 3/32"
wide strips. I then taped the plans to a sheet of plywood and screwed some
pine 2x2 blocks to the sheet along the line of the stem. I slopped epoxy on
each face of all of the strips and pulled them around the blocks and applied
a shit-pot full of clamps. The book
says that this process is messy, and they are absolutely correct. Gloves,
while difficult to do any work in, are highly recommend, otherwise your
hands will be absolutely coated in epoxy.
|
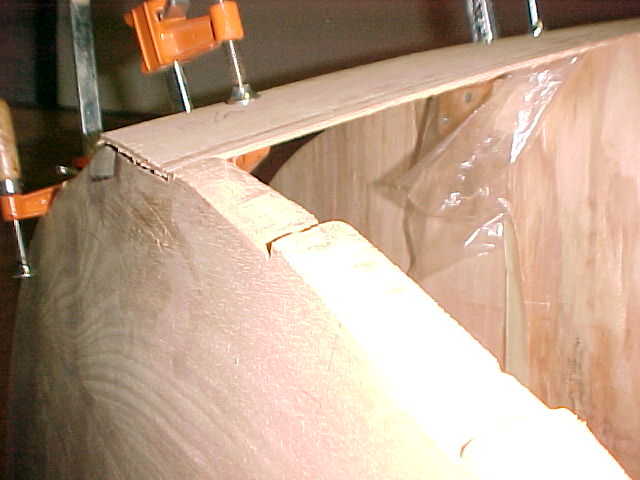
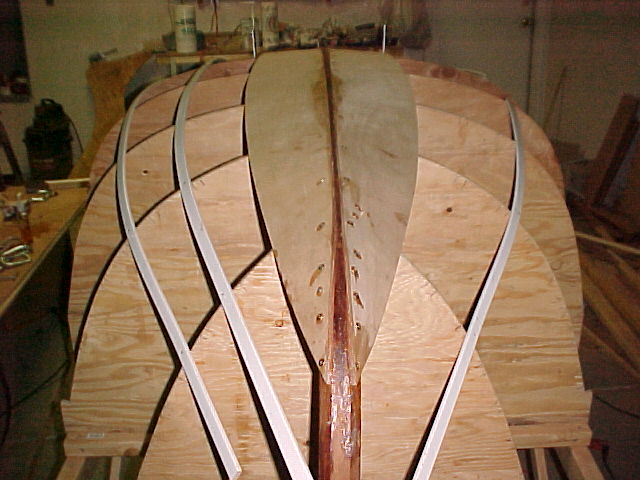
| 5/21/01
-
The Transom |
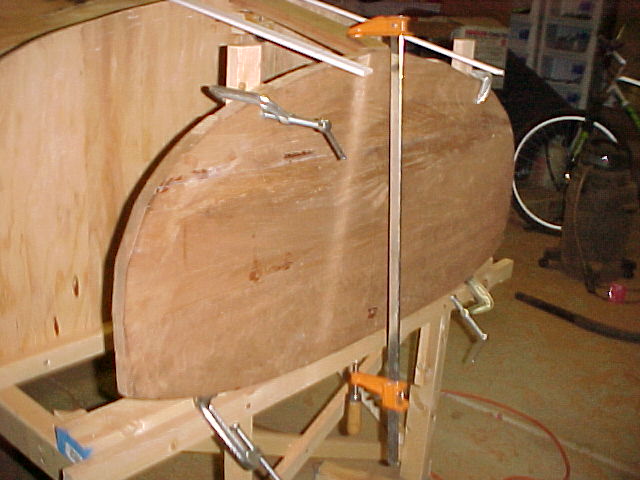
I've glued up the planks for the transom and done a cursory shaping and planing, and now I'm
testing for fit and fairness. I first cut the transom using the fair curve lines
from the plans, neglecting the teeny-tiny little note that says to cut
the transom to the inside facing of the planks and not the lines. To
fix it I had to cut off the bottom of the transom, glue a new plank and cut it.
|
| 5/27/01
-
A Leap of Faith |
I've spent what seems like days and days measuring and eyeballing the lines
of the hog, which is a 2" wide piece of mahogany the forms the backbone
of the boat. This was one piece but to get it to form to the curve of the
bottom I actually cut it into two 2" X 3/8" pieces, which I am gluing back
together now. Up to this point I could if need be backtrack a few steps if I
screw something up,
but now I'm at the point where this becomes much more difficult.
|
| 5/27/01
-
A Leap of Faith Continued |
Here I'm gluing the stem that took hours and hours more and buckets of epoxy more
than should have been used, so I'm naturally nervous about the whole thing.
|
| 7/2/01
-
I'm Back! |
It's been an awful long time since I have had a chance to work
on the boat, but I'm back and I have a new tool; a spokeshave. I
finally had to order one of these babies on-line (Amazon.com of
all places!) because none of the local wood shops had any, and the
ones that would order one for me applied a damned hefty markup. Anyway,
once I got a spokeshave, I was able to attack the globs of epoxy left
over the outer stem, and here is a nice little picture of it. It's
amazing how much more efficient this tool is than a block plane for
many jobs like this.b
|
| 7/4/01
-
Happy Birthday! |

Happy birthday to you -
Happy birthday to you -
Happy birthday dear USA-A -
Happy birthday to you!!!!
|
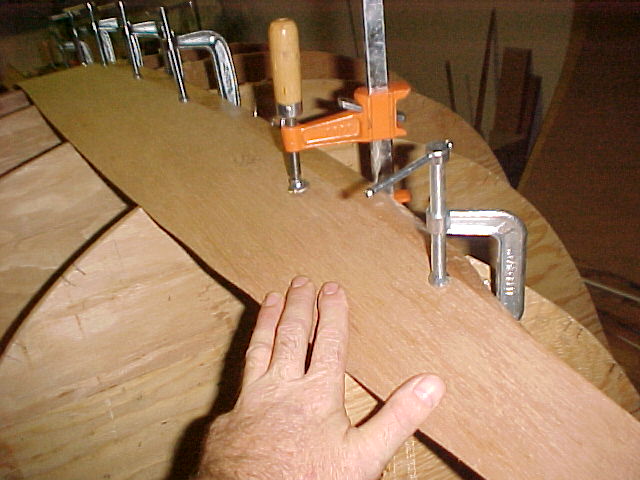
| 7/7/01
-
Making Patterns |
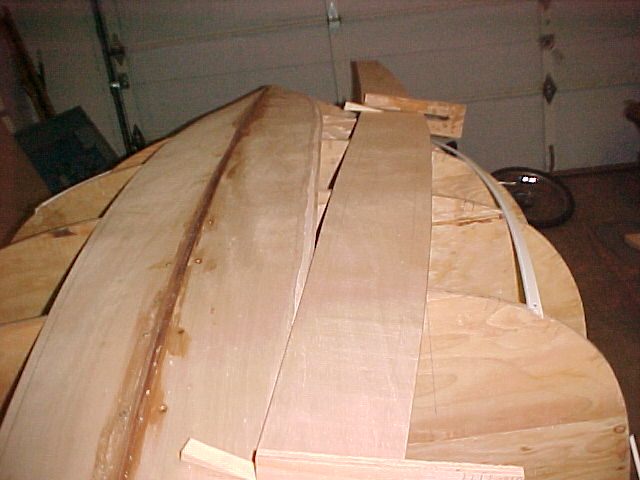
It's now time to make a pattern of the first plank,
also known as the garboard strake. This will serve as
both a bullet proof way to cut both sides accurately,
but it also allows me to test the fairing job I've
done on the keelson, stem and transom.
Here is the transom being tested with the pattern.
I'm not too pleased with the picture because it doesn't
show very well the angle at which the strake landing
places on the transom had to be cut. It's kind of
nerve-wracking chiseling away at this expensive lumber,
but I'm getting used to it.
|
| 7/4/01
-
Pattern in Place |
Okay, now I'm as happy as I'm going to get with the
fairing job. I am nowhere near the level of craftsmanship that
I would like to accomplish, but I am certain that it's as
good as I can make it given my current skill level. My son
Sean keeps asking me if it will float. At this point in
the project, that's hardly a measure for success.
|
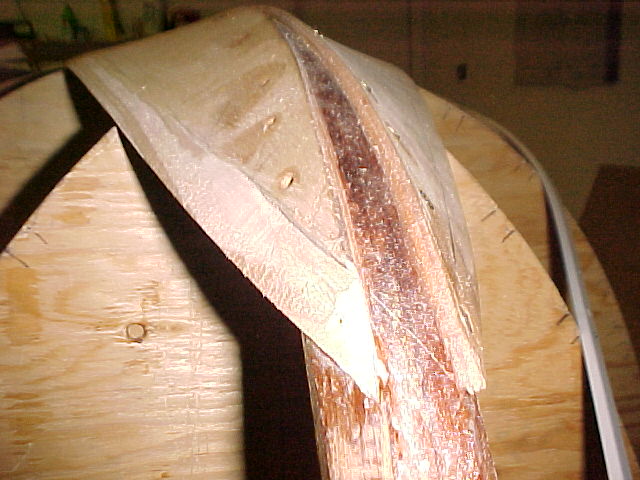
| 10/28/01
-
Placing the garboard strake |
It's been a while since I did any real work on the boat. That's
partly due to the unavailability of suitable marine grade lumber in
Phoenix, if you can imagine that. I finally broke down and ordered four
sheets of very nice marine grade, 1/4" okoume, which arrived yesterday
so now I have no excuses any more. Here I've placed the garboard strake
and glued it up. I'm using brass wood screws to hold the strake in
place while the epoxy sets up. They'll be removed and the holes filled
when the time is right.
|
| 10/29/01
-
Placing the second garboard strake |
I apparently didn't measure something right, or something wasn't quite
fair, but after setting the second garboard, you can see that there is a
pretty large gap down the center line. I know I'll be able to work around
the gap later, but I'm worried about the effect of the strakes being to low
and throwing off the alignment of subsequent strakes.
|
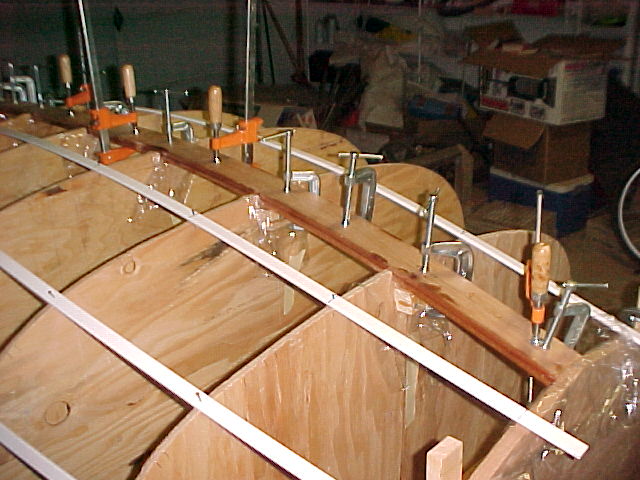
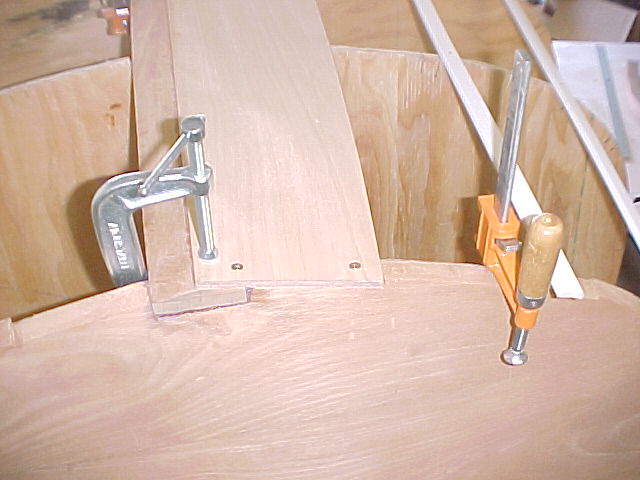
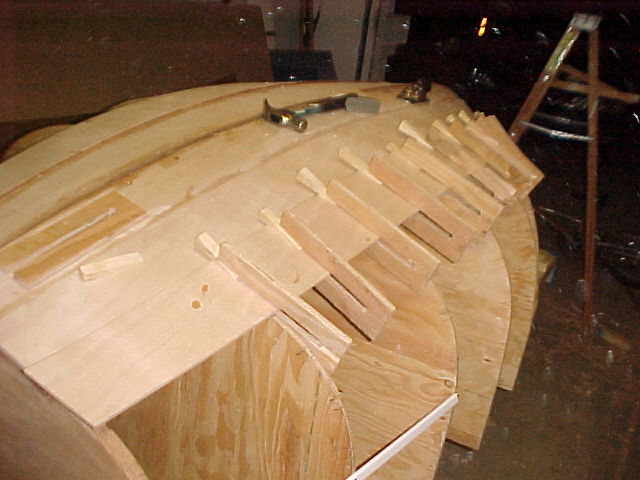
| 11/02/01
-
Cutting the rebate |
In order for the next plank to lie properly at the stem, you have to
chisel away a channel, or rebate for the plank to land on. I was
actually dreading this, but it went pretty well.
|
| 11/02/01
-
Making clamps |
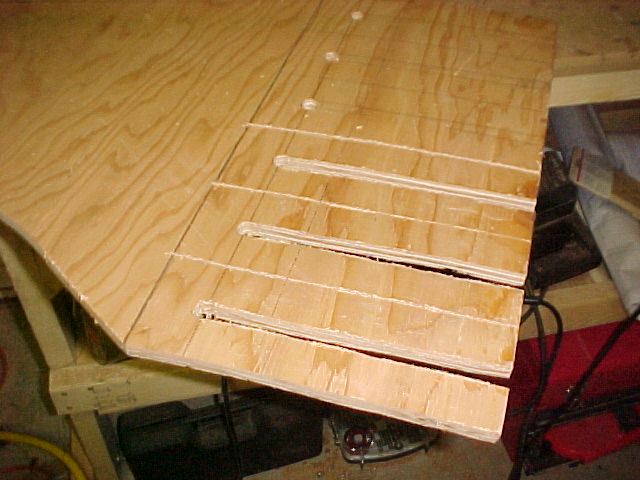
The number of clamps needed to hold the second plank is somewhat daunting,
not to mention expensive if you choose to buy them. Naturally, I, being a
cheap bastard, fished about for some other way. Here I'm making some twenty
or so plywood clamps and wedges from really cheap, nasty plywood. I figure
they cost about 2 bucks to make. My kind of tools.
|
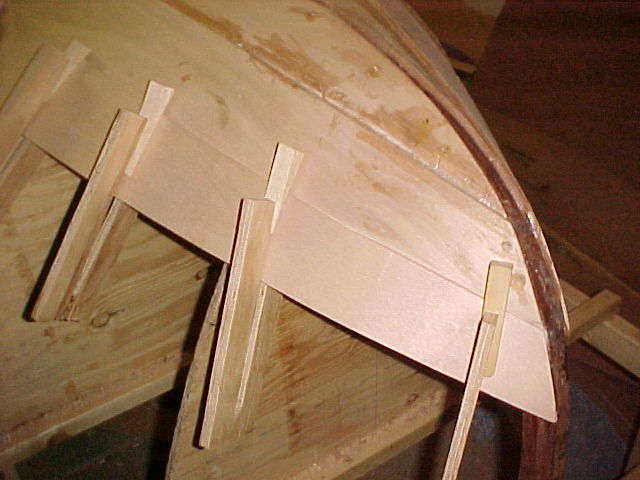
| 11/03/01
-
Placing the next plank |
Now it's time to see if my measuring and planing worked. You have to
put a bevel along the edge of the preceding plank (in addition to the
rebate) to allow the plank to be well and truly glued. This helps to
avoid the embarrassing condition in which you have a beautiful hand
made craft that immediately sinks upon being placed in the water.
|
| 11/04/01
-
Plank, plank, plank |
Okay, I'm boogeying now. My work is beginning to fall into a predictable
sequence that goes like this: Cut the pattern. Fair the pattern. Place the
pattern. Note that the pattern is all screwed up. Re-cut the pattern.
Place the pattern. Accept the pattern for what it is. Say to hell with
it and get a coffee. Cut the plank from the pattern. Plane, plane, plane.
Glue the pattern. Accept the plank for what it is. Cut the pattern...
|
| 11/09/01
-
If you half-squint your eyes... |
Hey, am I hallucinating, or is this actually beginning to
look somewhat boat-like?
|

 Winner of the coveted Walsh Award!